Would you like to make this site your homepage? It's fast and easy...
Yes, Please make this my home page!
The Flxible Clipper Handbook
- by Pete Snidal (C)2004
Maintaining Your Air Brake System
Operation of each of the components of the Air Brake must be monitored
at all times. In addition, a "Pre-Trip Inspection" should be carried
out before every movement of your coach. This will check the operation
and security of each of the elements in the system.
1. The Compressor
Air brake compressors function efficiently year in and year out for a
long time between required servicings. Thus it is easy to take them for
granted, but parts do wear, and their operation will degrade over time.
The best way to monitor their performance is simply by observing how
long they take to build up air when the vehicle is started with the air
depleted. This is also the time to check the operation of the Air
Pressure Regulator - does it "cut out" at the proper high limit, and
"cut in" at the proper low one? Here's the procedure:
Upon starting the engine, the driver makes a note of the position of
the second hand of his watch - or begins counting, and notes the time it
takes for the air to build up to a certain value - the end of the
gauge's "red zone," is a good one. The air pressure of
the system, assuming it's starting at Zero, must reach the end of the
"red" zone of the gauge - 80 psi - within 90 seconds. It must continue
to build to 120 psi, according to BC DOT regulations, within 3 minutes.
At this point - and this is important! - it must STOP building pressure
- ie, the regulator must deactivate the compressor and the gauge will be
seen to stop climbing. If it continues to climb, there is a fault in
the regulator, and the engine must be shut down and the condition must
be checked.
Once it has been established that the compressor is building air within
the required time limit, and that the regulator is "cutting out" at the
required pressure, the DOT-mandated Pre-Trip Check requires that the
operator then reduce the air pressure by "fanning" the brake pedal
repeatedly until the low limit is reached, and ensuring that the
regulator "cuts in" at that pressure. With the Flxi's, it should cut in
- ie, the gauge should begin once more to climb - at the top of the
"red zone" - the 80 psi lower limit. Once again, the max pressure of
120 psi must be attained in a reasonable time period - within 2 minutes
- and the compressor must once again "cut out."
During the period of brake fanning to reduce pressure, you should also
observe just how much of a pressure drop you get for each application of
the brakes. How hard the application is should make little difference -
the air chambers fill with a 1/2" brake pedal movement just as much as
when it's floored. (This should NEVER be done when the spring brakes are
applied, by the way - more on this later.) A drop of about 5 psi per
brake application is normal. Much more than this is a sign of possible
leakage of a line or air chamber. If this occurs, the operator should
have a helper apply some brake while he listens at each wheel and under
the bus in general for the sound of any escaping air.
Once the compressor and its regulator have been checked and approved in
this fashion, we may proceed with the rest of the system.
2. Reservoirs, Lines, And Brake Chambers
The engine should then be shut down, and a "walk-around" should be done
to listen for any signs of escaping air. It is a good idea to have a
helper apply brake as well - 1/2-3/4" of brake pedal is enough - while
you listen for any sign of air escaping from an air chamber. Of course,
if any air leak is detected, it must be investigated and repaired.
Leaks may be checked for with soapy water applied with a brush to
suspected joints and lines. Air escaping within a brake chamber
indicates a leaking diaphragm, and this condition must be remedied
before operating the vehicle. Exchange brake chambers are not expensive.
If replacing a (double) (rear) Spring Brake chamber, remember NEVER to
attempt to dismantle the chamber!
3. The Brake Slack
Now for the slack adjusters - these must be checked before every trip,
and of course adjusted if necessary.
Before checking any brake adjusters, ALWAYS first ensure that the bus
cannot roll over you - you'll be lying down very close to a wheel in
every case. The spring brakes will have to be disengaged, since all
slack is of course taken up when they're on. This means you'll have to
block at least one wheel - fore AND aft! - even if on level ground - and
more if on a slope, before disengaging the spring brakes. If you still
have a driveshaft brake as well, it won't hurt to engage it, but it's
not a good idea to count on this as your only safety, especially if it
hasn't been tested recently. (It may be tested by attempting to move the
bus with the handbrake set, and no blocks at wheels.)
Once the safety considerations have been met, it's time to check the
slack at each adjuster. Truck supply houses sell a "Brake Buddy" (TM) -
a special wrench with a fitting to allow it to be used as a lever on the
slack adjuster. These are a handy thing to have in the tool box - with
your tire pressure gauge and tire beater. If you don't have one,
you'll have to move the slack adjuster some other way, but the object in
any case is to move the slack adjuster at the pushrod end back and
forth, checking the distance it moves at this point.
The slack should be set to 1/4." If it moves more than 1", it must be
tightened. This is accomplished by rotating the adjuster worm, by means
of the adjuster bolt, about the pinion gear until all slack is taken up,
then backing off on the bolt until there is 1/4" of free play.

Brake Off. The only way to tell
if this brake is sufficiently tight is physically to move the slack
adjuster lever until movement is stopped by contact of the shoes against
the inside of the brake drum. As movement approaches 1", adjustment is
indicated. |
The Slack Adjusters and Brake Chambers At Their Limits Of
Movement. |
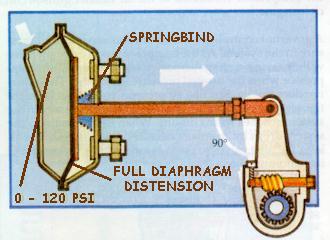
Brake Full On. This brake is too
slack - it should NEVER be possible for the diaphragm to reach full distension.
Spring bind in the return spring prevents any pressure from being
exerted against the brake shoes. Furthermore, even if the brake is
operating at this point, there is no "wiggle room" for brake wear or
fade. |
Danger Alert! - Reversing Adjustment!
NEVER count on simply tightening up the adjuster bolt, and then moving
it back a half-turn! It is possible that an adjuster has been installed
in such a way that clockwise "tightening" of the adjuster bolt may in
fact be LOOSENING! Hence, the misguided operator may be taking the
adjuster to Full Loose, then tightening a half-turn, which is obviously
a waste of time and a huge danger! Some slack adjusters may be fitted
upside down or inside-out, and this condition will then attain.
The slack MUST ALWAYS be re-checked after adjustment by physical movement
of the slack adjuster and pushrod. A further check may also be useful:
if you have an assistant make a light brake application while you
observe the action at each brake, you should see only 1/4" of movement
of the pushrod and adjuster end after adjustment. If this method is used
as a pre-adjustment check, be sure to re-adjust (and re-check!) if
observed movement is approaching 1".
4. The Push Rods
The brake chambers exert the greatest mechanical advantage against the
slack adjuster levers when the angle between the pushrod and the lever
is 90 degrees. Consequently, when new brake shoes are fitted, the
pushrod length is adjusted so that this angle will be just a bit over
90, and as the shoes wear (this wear of course being compensated
for on a daily basis by slack adjustment), the angle at the point of
contact will become a bit short of 90. This compromise must be
readjusted so that the angle at full brake application is as close to 90
degrees as possible. This is accomplished by physically changing the
length of the pushrod with the adjustment provided. This is not a daily
procedure, but it should be monitored and corrected as necessary.
Spring Brake Adjustment
Since the Spring Brakes are an integral part of the rear brake chambers,
when the rear brakes are adjusted, so are the spring brakes. ie, they
require no further or special adjustment.
Monitoring Brake Shoe Wear
Brake shoe wear should also be monitored. Most vehicles require
periodic removel of the wheels and brake drums so that the shoes
and drum surface may be inspected for wear, and this is a good idea with
the Flxible Clipper brakes as well. However, on most models, the brake
drums are open enough so that the shoe thickness may be monitored to
some extent. The thickness of the brake lining riveted to the brake
shoes should not be allowed to reach less than 3/16". If lining this
thin is detected, proceed directly to a reliable truck brake repair
facility for lining replacement. Have the front wheel bearings repacked
at the same time, of course, and the drums inspected carefully for
excessive wear, cracking, or any other defects. Do not rely on
difficulty with brake adjustment to tell you it's time to replace your
brake shoes, although this may sometimed also be a problem indicating a
need for replacement.
Hit your browser's "back" button to return to the index