Would you like to make this site your homepage? It's fast and easy...
Yes, Please make this my home page!
An Air Brake Primer
An Air Brake Primer
- by Pete Snidal (C)2001 - revised May 2005
This little text file began as an email I wrote outlining the most basic
"need-to-knows" about air brakes. it is not intended to be a substitute
for proper air brake training and certification, but I suggest you read
it carefully, if for no other reason than to learn what you don't know
- and why you need to know!
First, let me say that in all of Canada, and I'm sure in most if
not all of the States, you must have an air endorsement on your
driver's licence to be permitted to drive an AB equipped vehicle.
Although I'm hardly a fan of regulations, I almost have to agree
with this one. It'd be a very irresponsible thing to do to drive
one without having taken the time to master the details of Air
Brakes. Following is a brief discussion of the differences between the
two types of systems. This is not intended to make you an expert, but
rather to motivate the reader to seek the education - and certification
- to run an airbrake-equipped vehicle intelligently - and most important
- safely.
Consequences
Failure to recognize - and compensate for - the difference in Air Brakes
will inevitably result in mayhem - and probably death. Although there
have been many regulations imposed in the past 40 or 50 years in various
jurisdictions, it still happens all the time, although fortunately less
often.
A Scary Scenario..
Imagine this. After lots of searching, you finally found that wonderful
classic bus conversion you've wanted for years. And now you're driving
along merrily in your "new" 20,000 lb.motorcoach. It runs wonderfully,
it steers great, and it stops on a dime! Those Air Brakes are just
wonderful! You haven't done too many miles, yet, but every time you've
stepped on that big air brake pedal, you've been really gratified at how
well it worked!
So, now, as you approach the top of this downhill grade, you do so with
great confidence. After all, those brakes have worked GREAT so far -
what could change?
The first time you use the brake, they work like they always have - so
far. The second time you apply them, same thing - slows it down from
50mph to 35 in a heartbeat. But the next time you use them, NOTHING
happens! Nothing! The thing just rolls blithely on, as if you weren't
using the brakes at all!
What could be wrong? You check the pressure gauge on the dash - it's
well in the green, lots of air pressure. You've been keeping an eye on
it; after all, everybody knows air brakes need air.
So you hit the pedal again. And again! (What else can you do?) It feels
just like it always has, and you hear the air whoosh back when you
release it, but when it's down, there are NO brakes! Finally, in
desperation, you hit the parking brake release on the dash - the
so-called "maxi" brake. Still nothing!You're in trouble!
This kind of trouble:
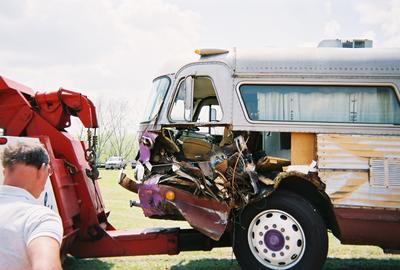 The Consequences Of
Bad Brake Adjustment - Click For Closeup The Consequences Of
Bad Brake Adjustment - Click For Closeup |
This coach used its last brake application before the attempted
one that had this result. There was NO difference in pedal feel between
the first one after adjustment and the one during which this
happened!
Fortunately - and miraculously - there were no serious injuries but you
can bet the driver has become a Christian about brake adjustment! |
What went wrong? Can this really happen? Yes it can, and it WILL -
unless you began your bus adventure properly equipped with the knowledge
that Air Brakes Are Different! - They must
be checked and adjusted as the shoes wear, and this must be done on a
regular and frequent basis. Meaning Daily! or more!
May I Emphasize This?
It is impossible to overemphasize this. Let me say it again:
Air Brakes Are Different!
Air Brakes Are Different!
Air Brakes Are Different!
Air Brakes Are Different!
|
This is important! |
They Must Be Checked Daily!
They Must Be Checked Daily!
They Must Be Checked Daily!
They Must Be Checked Daily!
|
Now, let's look at why:
1. The Differences
If you are to operate an airbrake-equipped vehicle, you must
understand the differences between this type of brakes and those of the
vehicles with which you are already familiar.
The first and most major difference is the complete lack of "feel" in
the brake pedal, a feature to which we all become accustomed - and
complacent - with the hydraulic brakes found on virtually all passenger
cars and light trucks.
How Air Brakes Operate
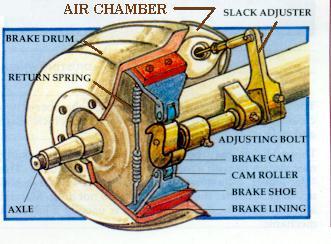 |
The "business end" of the air brake system. Air is admitted to
the air chamber through the treadle valve, or brake pedal. Air pressure
behind the diaphragm in the air chamber forces the push rod to move the
end of the slack adjuster - the adjustable lever which rotates
the S-cam shaft. The rotating S-cam forces the brake shoes
against the drums. The resulting friction dissipates mechanical energy
into heat, thus slowing the vehicle down, and also wears down brake
lining during each application. Thus, every time the brakes are
applied, more movement of the air chamber pushrod is required than for
the time before. The resultant increase in slack in the system must be
adjusted out regularly - well before the limit is reached!
|
Air - A Valve, Not A Pump
Of major importance is the difference between air and the "normal"
hydraulic brakes with which all are familiar - the air brake pedal
is not a Pump, as with hydraulic brakes, but rather a
Valve. Operation of the brake pedal - correctly called the
Treadle Valve - admits air to the brake chambers to apply the
brakes. The linkage between the air chamber and the brake shoes
is external, to permit regular and frequent checking and
adjustment.
With hydraulic brakes - the type we're all used to in our cars, as the
linings wear, the "feel" of the pedal changes - it takes more pedal
movement to take up the slack as the shoes move farther before
contacting the drums. This continues until the brakes are
adjusted - the physical linkage between the wheel cylinders and
their brake shoes is lengthened by a screw adjustment. This is done by
your mechanic during brake service, or to a certain extent by
"automatic adjusters" in the wheels, which tighten up the linkage each
time the brakes are applied in reverse. But - and this is important -
even if brake adjustment is neglected, hydraulic brakes can be
"pumped up - the pedal can go all the way to the floor, but a
second application will just send more fluid to the brake cylinders,
and braking will still occur! (Providing, of course,
your brake fluid reservoir level has been maintained!) This is because,
with hydraulic brakes, the master cylinder - operated by the brake
]pedal - is simply a pump - each stroke adds more fluid to the
system until all the slack is taken up, and the shoes contact the drums.
But with Air Brakes, no such "pumping" is possible! When the
adjustment is gone, it's gone! - the pedal is not a pump! It is
simply a valve which directs air flow to the brake chambers -
these contain diaphragms by which air pressure is translated into force
on the brake shoes against the drum.
These Air Chambers have limited movement. As the brake shoes
wear, more movement is required on the part of the push rod to apply the
brake. The brake linkage must be tight enough so that the brakes
are applied before the limit of travel of the air chamber is reached.
Once the maximum movement of the air chamber is reached, no
amount of "pumping" will have any effect on the non-action of
the brakes.
NO Difference In "Feel"
Once the chambers have travelled their full extent, if the shoes are still
too far from the drums, there's NOTHNG that can be done from the
cockpit! And there's no
difference in "feel," - whether the brake chambers need only a little bit
of air - tight brakes, or almost all they can stand - loose brakes.
The treadle valve feels the same - just as opening a tap to fill a
bathtub feels no different from opening one to fill a washbasin!
An analogy as it was once explained to me is that of the handlebar brake
lever on a bicycle or motorcycle. If the cable is too loose, the lever
will contact the handlebar before the brake is applied. No amount of
extra squeezing can help at this point, the cable must simply never be
allowed to get this loose. But the difference is as the slack
increases, you can see it! You can't see the slack building up in
your brake linkages unless you get down under there and check it!
There is no other way. This is the reason for the signs on the mountain
passes saying "Truckers - Stop Here - Check Brakes." At these spots - as
well as at many others, truckers - and other operators of airbraked
vehicles - must "get out and get under," to check and/or adjust brake
slack. That failure to do this can have disastrous consequences
is dramatized by the photo above.
One At A Time
There is an insidious aspect to this "creeping brake failure" as well -
the brakes seldom all fail at once; rather they go one at a time. If
you're using just a little braking, you probably won't notice that
you're down to 3 brakes, then two, then, possibly, even one! But this
reduced braking is the only warning you might get that
your braking is eroding away as you drive!
As loose brakes wear just a little bit more, you get a situation
in which the chamber moves its maximum, but the brake on that
wheel still isn't engaged! This "feels" just the same to the driver -
depressing the pedal allows airflow to the brake chambers, but when the
chamber is full and stops moving, the brake for that wheel is not
applied - but in the light applications you normally use, you have no
way of knowing that you're now down a brake - or two!
A Wear Spiral
And of course, the remaining brakes which are still working are taking
more load, and wearing faster than previously, thus running out of _their_
adjustment! And of course, your stopping distance in a panic situation
has dropped by the power of one brake. Worse yet this situation will
continue for the next brake to run out of adjustment as well, and now
you're _two_ brakes short! - Until, finally, if you don't catch it,
you'll be down to NO brakes! - And this entire scenario can easily play
out on one good-sized hill!!
And remember - when this happens with ABs, all the "pumping" in the world
will do you no good; the chambers are at their full extension, and the
brakes are too loose to care. This is why you see those "Trucks Stop -
Check Brakes" signs at the tops of the big hills on the highways. This
is also the reason for the laws, which don't seem to have stopped the
articles in the news we still see regularly about trucks "losing their
brakes" on hills once in a while and wiping out carloads of civilians.
Happens here in BC a few times a year, even though the drivers have passed
the air brake test, which has come to be another government formality
which too many drivers apparently feel just needs to be gotten around,
but to which they otherwise pay little attention. (You can lead a horse
to water, but you can't make him think!)
What To Do?
Avoiding this ugly scenario is clearly the responsibility of everyone
who drives any airbrake vehicle - even across town or around the block.
You must at all times know for certain what the adjustment
status of your brakes is - as well as the state of your air supply.
Fortunately, the latter is simple enough to check - you will have a
reservoir gauge on your instrument panel. This gauge tells you
the pressure of your reservoir - it will fall just a bit each time you
apply the brakes, and rise as the compressor "kicks in" and
repressurizes to its pre-set limit. More on this later.
The adjustment of the brakes themselves can be checked in only one way -
getting out and getting under, and physically checking the slack in the
linkage between air chamber and brake linkage.
Danger!
In order to check the brakes, they must be off - ie, no pressure
to the brake chambers, the diaphragms being fully back. This means the
vehicle can move, possibly rolling over the brake checker, unless some
other means of limiting movement is used. Thus, even on level ground,
only the very foolish will fail to carry a pair of wheel chocks, which
will be in place before any rolling under the wheels is done. If you
have a reliable mechanical driveshaft brake, or an automatic with
Park position, or standard gearbox in gear with engine off, you may
choose to rely on these alone, but the best approach is the ol'
"belt-and suspenders" one - be absolutely sure you're not going to get
any surprises while you're laying under your tires! And of course, you
can't leave an air maxi-brake (spring brake) on and adjust the rears -
more on this later.
Adjusting Out The Slack

The Single-Pot Brake In The Off
Position.
Note that both the shaft clevis on
the shaft and the pushrod length
are adjustable. |
Tightening the worm adjusting nut rotates the clevis about the
cam shaft, taking out the slack. Note the two adjustments - slack
adjuster position and pushrod length. |
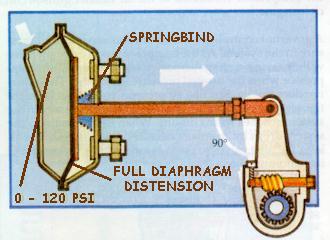
The On Position. Note that the
brake clevis is
perpendicular to the push rod when the slack
is taken up. Note also that the pot is at the limit of its travel.
- Past Adjustment Time! |
As shown by the drawings above, (cadged from the BC Air Brake Manual -
with value added)
the diaphragm in the brake chamber has only a certain amount of
movement. There must be enough slack in the linkage to allow the brake
shoes not to contact the drums when the pressure is off, but there must
never be too much slack, which will allow the diaphragm to reach
the limit of its travel before contact is made. Note also that the
ideal angle between the pushrod and the brake shaft clevis is 90 degrees
at the point of shoe-drum contact. This gives the greatest mechanical
advantage. Periodic Pushrod length adjustment is necessary to maintain
this situation, but the necessity crops up much less often than the
daily (or less!) requirement for slack adjustment.
Diaphragm distension is not limited by applied pressure - the movement
limit is reached with only a few psi; after that, increasing pressure
(by pedal movement) increases brake action.
Checking Adjustment
Once out and under, checking the actual adjustment of each brake pot -
there is one behind each wheel - is done by physically manipulating the
brake clevis from the no-pressure position to the limit of full
movement. This is most easily accomplished with a lever-type tool -
also an adjustment wrench, called a "Brake Buddy" (TM). But you can do
it in a number of other ways - the strong will do it with their bare
hands. Important thing is to ensure that you check the full
movement! If the pushrod travel exceeds 1/4-3/8", adjustment should be
done. If it's over 1 1/2", you're lucky you're still alive! it's time
to tighten the worm nut and re-check, repeating the process until
the adjustment is correct.
Another Possible Problem
Some drivers don't pull on the end of the slack adjuster to check slack.
They've gotten lazy, and they just use their wrench to tighten the slack
up completely, then back off a half turn or so. But there is a serious
danger in this method! It's possible to be loosening the linkage
all the way, and then just tightening it that half-turn! - Which is of
course an invitation to disaster! Bear in mind also, that "lefty-loosey"
and "rightey-tightey" don't always apply with slack adjusters - they can
be installed upside-down, so this rule won't apply. For this reason,
you should always pull the slack adjuster away from the
air chamber, and see how far it moves. More than 3/4" means it's time
to tighten it up till there's no movement, then back it off a
half turn or so for about 1/4" of movement when you - and this is
important - re-check.
How Often?
Legally, alll trucks must stop at every trucks-stop-check brakes area
and check slack - and you should, too!. While walking around, you should
also listen for any
hissing air - sign of a leak developing or developed. It may be argued
that Motor Homes and Converted Busses, being lighter, stress their
brakes less and can handle more extended periods between checks. What
is important and indisputable, however, is that you must check
often enough to be sure that none of your brakes is
ever too slack! Check them often, until you get a "feel" for how
much wear you're doing on the road. Obviously, cruising the prairie,
you'll likely find you can go for days without finding much wear/need
for adjustment, whereas a few hours in the mountains can wear them down
enough to need it. Use your head - and when in doubt, check!
"Two-Man" Adjustment Check
There is an easier way to check your adjustment - if you have a
co-driver, that is. That way is just to stop, chock the wheels or
otherwise prevent movement, and have the co-driver(ette) give a light
application of the brakes each time you position yourself to observe the
movement of the brake mechanism for each wheel. If the movement exceeds
the limit, then you have to get under there and tighten/re-check, but if
you're within limits, you can just carry on until the next check. There
are two advantages to this method: the first is, it's easier, but don't
miss the second: this ease should motivate you to stop and check them
more often - each time you stop for fuel or a snack, for example. It
takes little time and gives you a whole lot of peace of mind!
Another tip: carrying a broken-down cardboard box provides a convenient
"creeper" for brake checks - I keep one in my baggage compartment with
my brake adjusting tool. Just throw it down under the bus, and you have
a nice clean surface on which to slide under the rig. When it gets too
dirty, a fresh creeper can be had at any grocery store!
Other Considerations
Now that you're aware of the most important aspect of air brake systems,
there are other considerations as well:
Pushrod Adjustment
Pushrod adjustment is required only when the final angle between clevis
and pushrod at the point of brake contact gets too acute. Fortunately,
this doesn't happen nearly as often as excess slack in the mechanism.
Adjustment of this parameter is usually taken care of in the shop. But
you'll want always to make observation of the angle at brake contact a
part of your checks. When the angle gets too far from 90 degrees at the
point of brakeshoe contact, pushrod adjustment is required. So it's a
good idea to monitor this one during your daily brake checks.
Spring Brakes - Parking Brakes for Air-Equipped Vehicles
Another attribute of air brake systems is that they can incorporate
"Spring Brakes." These are secondary spring-operated brake applicators,
usually only on the rear axle(s), which apply the rear brakes for
parking or emergency purposes. In the event of air pressure failure,
for example, they can be designed to apply automatically. This can
result in driver embarassment - if you're not ready for it, sudden brake
application at highway speeds while you're still in the middle of the
driving lane can be stressful. But less so than finding your brakes not
working the next time you need them.
Spring brakes also make for excellent parking brakes. The full force of
the rear brakes is applied whenever the vehicle is parked. Being
spring-operated, they don't depend on air supply, and so stay on long
after the air reservoir has lost its pressure. In this case, they are
applied by means of a driver-operated valve at the driving position,
which releases the air pressure from the caging chambers. They provide
a further safety feature in that the vehicle can't be moved until the
air pressure builds up enough to de-apply the springs - and therefore
enough to use the brakes to stop once you've begun moving!
 Flxy's New Maxi-Pots Flxy's New Maxi-Pots |
Thus, the spring brakes (sometimes referred to as "Maxis," or
maxi-brakes) are always on, unless the spring is "caged" by the
second additional air chamber, "piggy-backed" onto the one already
there for the regular service brakes. To de-apply the parking brakes,
the system must first be brought up to pressure (the compressor) and
then the spring chambers are charged with air by means of the
dash-mounted parking brake valve. This offsets the springs and
lets the vehicle move. (In most cases, there is also a mechanical
means to cage the springs in case of emergencies - you get out and
under, remove the dust cap, and screw the cage bolts up by hand.)
|
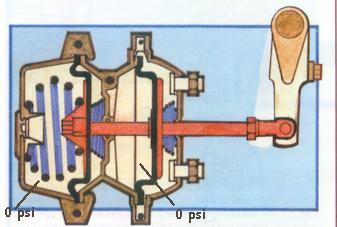
No-Pressure (Park) position -
spring is "uncaged," over-riding regular brake chamber and applying
full brake |
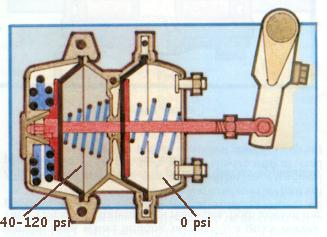
Normal Driving Position -
spring is caged by pressure to spring chamber, service brake chamber is
unpressurized - no braking action |
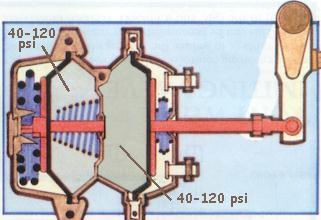 |
Service Brake on during regular
driving - Spring brake is caged, but application pressure to service
chamber applies brake
(Danger Note! -
Spring brake chambers, obviously, have big, heavy springs in them.
Attempting to dismantle them without proper information and precautions
will earn you a Darwin Award!
|
This kind of parking brake has a major difference over the brakes we'
re all used to - if the system loses its pressure, the de-application
pressure is also lost, and the parking brakes will come on as the
pressure decreases - providing an "automatic" setting of the parking
brakes if system pressure is lost on the road. This is another reason
we must pay attention to system pressure - if it drops to the danger
level, you need to pull over in the first safe place, while you still
have enough air to maintain control over your brakes, or you just may
find yourself stopped in the middle of the freeway!
But Not Always...
That is, provided
There is an alternative to providing the deapplication pressure from the
reservoir of the regular system. In some cases, the de-application
pressure is provided from a second special reservoir, supplied from the
first one through a one-way check valve, so that pressure loss in the
main system will not affect the pressure in the spring brake reservoir.
In this case, the spring brakes will only be applied when the dash-
mounted valve is operated to exhaust the air from the spring brake
chambers. This eliminates the "automatic" aspect of spring brake
application in the case of loss of pressure in the service brake
system, but allows greater operator control in that the second
reservoir can allow the operator to de-apply the brakes for such
things as small movements once the spring brakes
have brought the vehicle to a stop.
What About The Flx Clippers?
By the late '50's the last years of the Flx Clippers/Visicoaches, spring
brakes still weren't standard equipment - a driveshaft drum brake was the
parking brake. Many owners have upgraded their rear brake chambers
to spring brakes, installing the necessary lines and dashboard valve, thus
providing an extra margin of safety in the form of an excellent extra
brake for emergency situations involving loss of air, as well as a better
and easier-to-apply parking brake.
Your Flx may already have been converted. If not, you'd be well advised
to have it done. If in doubt, when you check your slack on the rear brakes,
have a look for double air chambers. If they're there, then you'll have to
find the application valve on your dash somewhere to release the brakes.
And always remember - the springs must be caged for the check of
adjuster slack to have any meaning. Obviously, if the springs are
deployed, there will be no slack - although this doesn't necessarily
mean that the brakes are applied!
More On The Air Supply
Obviously, you need at all times to have enough air on hand to make your
brakes work. This is stored in the brake reservoirs (two tanks,
and is "topped up" as required by the compressor, which cycles on and
off between two pressure limits. The compressor "kicks out" at the high
limit, and "kicks in" at the lower one.
Compressor volume is important. As a compressor gets old, its
ability to make air fast enough deteriorates. It HAS to make
air faster than you can be using it, in every situation, long
hills or whatever. The way you get a handle on this one is by
its build-up time when you first start the engine with empty
air tanks. The compressor needs to get your air pressure into
the green (over 80 psi, in the case of the Clippers) within 3
minutes, by law, (at least in BC). Mine does it in 90 seconds at
fast idle.
Governor Cut-Out
The air compressor must disconnect (it has a governor arrangement)
at the top pressure - 120 psi in the Flx Clippers. You can hear it with
a gas engine, with a Diesel you probably won't be able to, but
the gauge should stop climbing close to the 120 mark. If the governor
fails to disconnect the air compression, a "blow-off" valve on the first
reservoir tank is supposed to release. I haven't even been able to
locate mine to check it, but I keep an eye on my air gauge to ensure
that cut-out happens when it's supposed to!
Governor Cut-In
The gauge needs to
start climbing again (the compressor governor cutting back in) when it
drops down to the low limit - around 80 psi in the case of the Flx.
The BC air brake manual calls for "fanning" the brakes to release
enough air to get the pressure down, and then watching for the governor
to kick back in (motor running, of course) when you do your "Pre-Trip
Inspection" every morning before starting out. I haven't met too
many truckers who do this every morning, but it's not a bad idea,
in the case of a rig you don't use every day, such as an RV. And
of course, on the road, after you've used your brakes enough to get the
pressure down to the 80 psi range, you certainly want to see that needle
start to climb again as the governor cuts back in. If it doesn't, you'll
need to use what little air you have left by the time you notice to
STOP IMMEDIATELY and find out why the air isn't building back up. Your
perception will be aided by:
The Low Air Indicators
You need to be advised when your air pressure drops below a safe level.
The means of advising you are:
- Your Dashboard Air Pressure Gauge - only a fool would leave
home without one!
- Your Low Air Pressure Warning Light - this dashboard light
should shine when your ignition or master switch is on and your
pressure is low.
- Your Low Air Pressure Warning Buzzer - this should be sounding
when conditions are as described above
- Wig-Wags - there may be a "wig-wag" - a semaphore-like device
which drops into the driver's view from the header above the windshield
when the pressure drops to emergent levels.
The Low Air Warning Cutout Button - There should be a button on
the side of your cab that can be pushed to make the buzzer stop while
pressure is building up on startup. This is a Good Thing designed to
make you less crazy during warm-up while you're waiting for your air
pressure to build.
Checking The System
A serious benefit RV'ers have over truckers is that we usually have a
co-driver of sorts, who can be a help in checking our brakes. For
instance, someone at the wheel can apply the brakes while we visually
check brake rod/slack adjuster movement - and while the brakes are on,
we can listen for any sounds of air leakage on the application side,
such as from flex hoses or air chambers themselves. Truckers, operating
alone, don't have these options, and must always check slack by manually
moving the rod/adjuster - a tool called a "brake buddy," available at
any truck supply store, is invaluable here. Either way, checking actual
movement is all-important (more on this below.) And they can only check
for application air leaks by listening from the cab as the service
brakes are applied.
An application of brakes, once the pressure is up, shouldn't cause
the gauge to drop more than 5 psi. There should be no hissing
of air with the brakes applied, only a short release when they're
released.
Compounding
If your rig has spring brakes, you must not apply the service brakes
while the spring brakes are engaged (de-pressurized.) The pressure of
the springs, added to the pressure of the service brakes when applied
can cause serious problems - there's a lot of force there!
Furthermore, it is of course useless to check slack of the rear brakes
if the spring brakes are applied, since all slack will be taken up.
Slack must be checked on level ground, and/or with the vehicle prevented
from rolling with chocks or a driveshaft parking brake, and the spring
brakes caged (pressurized.)
Any Leaks?
Once your air gets up to pressure, shut off the engine, and walk
around the bus listening for any leakage of air. You will of course
need to correct any you find. Then have someone apply the brakes as
you check the
movement behind the wheels one at a time. If slack is over 1/2",
adjust the slack adjustment levers - not the pushrods. The SALs
have a bolt at their base which causes an internal worm gear to
rotate around the S-Cam shaft to tighten things up. They should
be tightened until it's no longer possible to move the rod, then
backed off 1/2 to 3/4 of a turn of the adjustment bolt.
SERIOUS WARNING: Drivers have been know to check slack not by
attempting to move the rod or slack adjustment lever, nor by observing
movement when someone else applies the brake, but just by "tightening"
the adjustment until it no longer moves, then "backing off" a half-turn
or so. Trouble is, you could be going to full loose, and then, when
movement stops, and you think you're "backing off, you're actually
moving towards slightly tight. "Lefty-Loosie/Rightie-Tightie" doesn't
always apply. YOU MUST CHECK MOVEMENT WHEN ADJUSTING!
The Reservoir
With the Flx Clippers, you'll find your two air tanks just ahead of the
left rear wheel. There are drain cocks on the bottom - to drain out any
water or oil (usually both) lying in their bilges. Momentary opening of
these cocks is not enough - it's best to pop the cocks at the end of a
day's run and let all the air go out, taking the sludge with it. Water
accumulates from condensateion, and some oil will escape from the
compressor - too much oil is an indication that it's time for attention
to your compressor, such as new piston rings.
Spare Belt!
Needless to say, if your compressor drive belt (if fitted - some
diesel compressors are gear-driven) goes south, your safe driving time
is measurable in minutes. You will notice, if you're observant, that
the gauge goes down past the "kick-on" pressure and keeps dropping. If
you've failed to notice that, there will be other indications (see
below) which hopefully will give you enough time to find a safe place to
pull over and investigate. And if it's a blown compressor belt, will
you have one on board? This is obviously as important as a spare water
pump/fan belt, and even moreso than an alternator belt. So you'll want
to be sure to have one of each of these with you when travelling.
Summary
This isn't the full air brake course, but hopefully it will help you
decide what you need to know, and get you on to signing up for that air
brake licence and endorsement.
You need to find out all you can about air brakes, their maintenance,
checking and adjustment. Ask a trucker friend, get an Air Brake Manual
at your local DMV and read it till you know it. It's not really very
complicated, especially on single-axle non-trailer vehicles. This
little treatise is my attempt to get you "up to speed," and is primarily
designed to motivate you to get the whole course somewhere.
